
One of the first big steps in writing Flutter apps is grasping the idea of state management. There are many different approaches for managing states, such as Riverpod, Provider, Inherited Widget, or even the most straightforward – simple SetState(). However, when you scroll through job boards, BLoC emerges as the most widely commercially used state management tool in the Flutter framework.
It doesn’t matter whether you are an experienced mobile developer or just starting your adventure with Flutter apps – at some point, you’ve either already learned BLoC state management or will do it soon. This article is here to help you get the general idea 😊
Why BLoC?
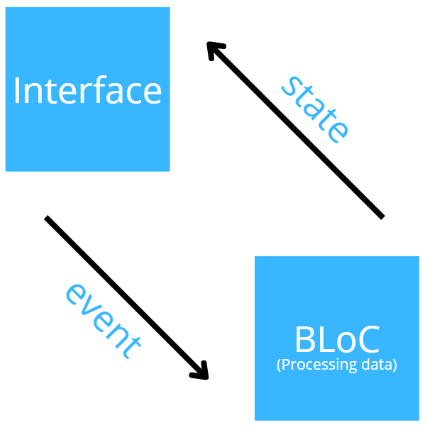
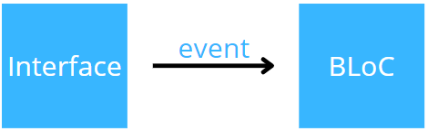
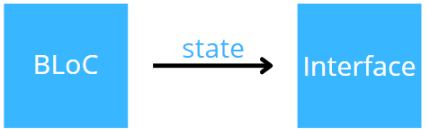
BLoC stands for Business Logic Component. The whole idea is to provide a Stream of events from your UI to BLoC and if something happens (when an event occurs) – return a new state back to the UI. The continuous flow of data makes it accessible and easy to manage.
Practical Use
BLoC Set-up
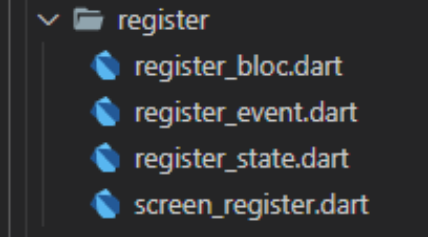
Let’s work with an example – imagine you have UI designed for creating an account for whatever type of app. Typically for convenience and to maintain clean architecture, we should split BLoC into three files – event, state, and bloc. So let’s split our directory.
Assuming that our form should have five input text fields (name, last name, email, password, nationality) and one checkbox (for accepting privacy policy) - let’s set up state components for this screen. In file register_state.dart, create a simple class with initial default values for each property and basic getter:
part of 'register_bloc.dart';

class RegisterState {
  final String name;
  final String lastName;
  final String email;
  final String password;
  final String nationality;
  final bool privacyChecked;

  RegisterState({
    this.name = '',
    this.lastName = '',
    this.email = '',
    this.password = '',
    this.nationality = '',
    this.privacyChecked = false,
  });

  List<Object> get properties => [
    name,
    lastName,
    email,
    password,
    nationality,
    privacyChecked,
  ];
}
To modify the state, we need to design events in the register_event.dart file. They can be understood as ‘containers’ for data transportation. In fact, they are just a bunch of simple classes:
part of 'register_bloc.dart';

abstract class RegisterEvent {}

class RegisterEventName extends RegisterEvent {
  RegisterEventName(this.name);
  final String name;
}

class RegisterEventLastname extends RegisterEvent {
  RegisterEventLastname(this.lastName);
  final String lastName;
}

class RegisterEventEmail extends RegisterEvent {
  RegisterEventEmail(this.email);
  final String email;
}

class RegisterEventPassword extends RegisterEvent {
  RegisterEventPassword(this.password);
  final String password;
}

class RegisterEventNationality extends RegisterEvent {
  RegisterEventNationality(this.nationality);
  final String nationality;
}

class RegisterEventAgreement extends RegisterEvent {
  RegisterEventAgreement(this.privacyChecked);
  final bool privacyChecked;
}

class RegisterEventSend extends RegisterEvent {
  RegisterEventSend();
}
In the register_bloc.dart file, we need to provide a function that accepts an event and maps it to a state object, which is later emitted back to the UI:
import 'package:flutter_bloc/flutter_bloc.dart';

part 'register_state.dart';
part 'register_event.dart';

class RegisterBloc extends Bloc<RegisterEvent, RegisterState> {
  RegisterBloc() : super(RegisterState()) {
    on<RegisterEvent>(mapEventToState);
  }

  String _name = '';
  String _lastName = '';
  String _email = '';
  String _password = '';
  String _nationality = '';
  bool _privacyChecked = false;

  void mapEventToState(RegisterEvent event, Emitter<RegisterState> emit)
    async {

  if (event is RegisterEventName) {
    _name = event.name;
  }

  if (event is RegisterEventLastname) {
    _lastName = event.lastName;
  }

  if (event is RegisterEventEmail) {
    _email = event.email;
  }

  if (event is RegisterEventPassword) {
    _password = event.password;
  }

  if (event is RegisterEventNationality) {
    _nationality = event.nationality;
  }

  if (event is RegisterEventAgreement) {
    _privacyChecked = event.privacyChecked;
  }

  if (event is RegisterEventSend) {
    // do some action for example try to create an
    // account in the database based on input
  }
    emit(getBlocState());
  }

  RegisterState getBlocState() {
    return RegisterState(
      name: _name,
      lastName: _lastName,
      email: _email,
      password: _password,
      nationality: _nationality,
      privacyChecked: _privacyChecked,
    );
  }
}
Now, when all three files are set up, we need to find a way to trigger events to let BLoC know it should process some data.
Flow of Data
To track a piece of information through its lifecycle, we need to implement BlocProvider in the screen_register.dart file first. It is required to provide context for RegisterBloc. Then as a child, we can pass a view that implements BlocBuilder with an indication to RegisterBloc and RegisterState.
Side note: RegLogTextField() is a custom text-field, which is essentially a variation of Flutter TextFormField(). Property shown in the code - textListener: is an equivalent of onChanged: from the original TextFormField().
For simplification in the example only one text-field is shown. Remaining text-fields can be implemented in a similar way.
@override Widget build(BuildContext context) {
    return Scaffold(
       appBar: const RegLogAppBar( title: 'readme...'),
       body: GestureDetector(
           onTap: () => FocusScope.of(context).unfocus(),
           child: Theme(
                 data: RegLogTheme().provideTheme(RegLogThemeVariant.main),
                  child: SafeArea(
                        child: BlocProvider(
                         create: (context) => RegisterBloc(),
                         child: const RegisterView(),
                      ),
                   ),
               ),
          ));
       }
    }

class RegisterView extends StatelessWidget {
const RegisterView({Key? key}) : super(key: key);

@override Widget build(BuildContext context) {
    return BlocBuilder<RegisterBloc, RegisterState>(
      builder: ((context, state) => SingleChildScrollView(
          child: Column(children: [
              const SizedBox(height: 20, ),
              const RegLogText(text:
              'Please provide Your basic information:'),
              RegLogTextField(
                textListener: (value) => context
                                        .read<RegisterBloc>()
                                        .add(RegisterEventName(value)),
                hint: 'name:',),
              RegLogTextField( ...
In the example above, each time we provide some value to the text field, a new RegisterEventName(value) is added to BLoC.
In register_bloc.dart, function mapEventToState() is triggered and executes code surrounded by if() statement for this particular type of event (in this case RegisterEventName). After running the code, we map processed data to state object, with the help of getBlocState() function, and then, we emit state back to UI calling emit().
Summary
And that would be it! I recommend getting familiar with as many Flutter state management approaches as possible to get the best understanding of the concept. It’s best to develop simple apps to learn in practice. Thank you for reaching the end of this short article. I hope it was helpful 🙂
What You have to say about this - don't hesitate to comment :)